

Giant Nutcracker Construction Tips
The giant nutcracker is not a project for the faint of heart. If you start it, you need all the help you can get. Fortunately, our members help each other out, and this article is intended to record that information so that everyone can benefit from it.
- Diameter mismatch
- Mop head hair
Diameter mismatch
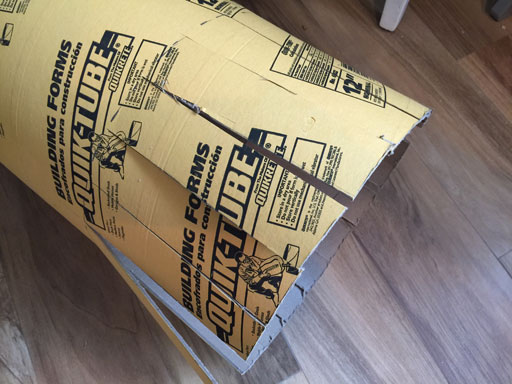
Construction tubes are not precision products, and their diameter varies from one tube to the next. If you don’t have the luxury of being able to measure and pick your tubes carefully, you may end up with a torso that is smaller than 12″ and legs that are bigger than 6″ in diameter.
That means that instead of the two legs fitting inside the circle at the base of the torso, they stick out. Of course, that doesn’t look nice.
At least two people reported this problem. Fortunately, on our YouTube channel, a very creative person who goes by the handle Oldalgebra1 explained how she solved it. Here are her pictures and explanations.
I measured 7.5″ up from the bottom of the body tube (the 12″ tube) and made a mark all around, both on the OUTSIDE and the INSIDE of the tube. (In retrospect, I wish I’d gone 8.5 inches up, instead of 7.5)
Then I reached INSIDE the tube and made a shallow cut all around, following the 7.5″ line. I scored all around twice, being careful not to cut very deep. Then, on the outside, I cut straight down from the 7.5 inch mark 14 times, making 2″ wide “fringe” all around the bottom. (I did not cut on the drawn circle around the outside of the tube. I just started the fringe cuts from that mark.)
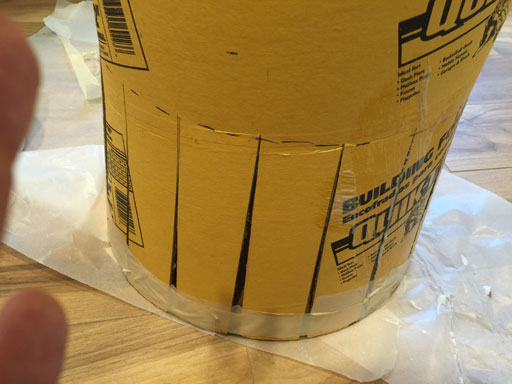
When that was complete, I cut two 12.5″ diameter circles from thick cardboard and glued the circles together. Next, I pulled/bent the tube fringe out from the sides of the 12″ tube and used the 12.5″ circle as a body base, gluing the bottom of the fringe around the outside circumference of the cardboard circle.
You can see that I wrapped masking tape all around the bottom to keep the fringe sections against the disk’s circumference while the glue dried.
When that was complete, the lower 7.5 inches of the tube flared out slightly from the upper part. The flare is very subtle, which is good, so that it won’t get in the way of the arms. (Many nutcrackers show a flared coat, just below the belt. So I plan to put my nutcracker’s belt just above the flared part.)
I put paper mache over the openings between the cardboard fringe to eliminate the gaps. I also put paper mache around the outside AND inside of the bent area to reinforce it.


Mop Head hair
Instead of faux fur, Denise found another solution:
I used the strands from a mop head, soaked in slightly diluted white glue, for the hair.

After painting the face and hair with primer, I masked off the face and used black spray paint on the hair, as I wanted to get into every crevice.

You may also be interested in

Giant Nutcracker
Craft Tutorial

Easter Basket made of fabric
Free Craft Tutorial

What paper to use?
Free Craft Tutorial

Worry Dolls
Free Craft Tutorial

Blue egg carton Flower
Free Craft Tutorial
This was very interesting and I will try it , in the mean time my husband took me to a Rona store and a sales person helped me pic out exactly the size I needed. So now I can make two giant nut crackers. I look forward to the tutorials which are so helpful. Thanks so much for all the help and posting this one.
You’re welcome! Good luck with your project!
When does the rest of the tutorial come out on YouTube?
Part 3 was published yesterday. Part 4 will follow soon. Parts 5 and 6 a bit later. See the full list here
what is the measurement of the the Balloon for the head
All the dimensions are specified in my book.